1. Introduction: The “Hidden Iceberg” of Metal Mold Costs
Why Mold Cost Is More Than a Quote
When you source a metal mold for die casting, stamping, or deep drawing, the first number you see is usually the tooling quote. On paper, a $25,000 mold looks more attractive than a $45,000 mold. But for procurement officers, sourcing engineers, and wholesale buyers, that price tag is only the tip of the iceberg. The real question behind how to make a mold for metal is not only how the mold is built, but what it will do to your long‑term production economics.
In real projects, mold decisions quietly control unit cost, delivery stability, defect rate, and even your relationship with end customers. A well‑engineered mold protects your supply chain: it runs with predictable cycle times, produces consistent parts, and requires minimal emergency repair. A poorly engineered mold does the opposite—frequent stoppages, rising scrap, dimensional drift, and hidden rework at the factory that eventually shows up as delays and quality complaints.
Why Engineering Decisions Matter Before Steel Is Cut
From YISHANG’s 26+ years in metal fabrication—including sheet metal parts, metal cabinets and enclosures, metal display racks, structural frames, and vending machine assemblies—we have seen the same pattern across thousands of OEM and ODM projects. The decisions made before steel is cut determine 70%–80% of downstream results. Cycle time, scrap rate, mold life, and even packaging and shipping stability are all consequences of what happens during metal mold design and manufacturing. in metal fabrication—including sheet metal parts, metal cabinets and enclosures, metal display racks, structural frames, and vending machine assemblies—we have seen the same pattern across thousands of OEM and ODM projects. The decisions made before steel is cut determine 70%–80% of downstream results. Cycle time, scrap rate, mold life, and even packaging and shipping stability are all consequences of what happens during metal mold design and manufacturing.
This article is a practical guide to how to make a mold for metal from the perspective of overseas B2B buyers. Rather than generic explanations, we focus on the engineering logic, risk‑control tools, and economic trade‑offs you should understand when choosing a metal mold supplier. You will see how simulation, steel selection, machining strategy, cooling design, and maintenance planning work together—and how each factor affects your total cost of ownership (TCO).
Throughout the article, we will occasionally reference YISHANG’s approach as a case study—not as advertising, but to give you real examples from a RoHS and ISO 9001 certified manufacturer that provides OEM & ODM metal products for automotive, hardware, electronics, appliances, vending machines, medical equipment, energy storage, and other industries. The goal is simple: help you ask better questions, select the right partner, and secure a mold that works for your business over the long term.
2. Phase I: The Digital Twin – Reducing Risk Before Steel is Cut
The first mistake many buyers make when thinking about how to make a mold for metal is assuming that mold making starts on a machining center. In a modern factory, the process actually starts on a workstation—inside simulation software. Cutting steel before validating performance is a high‑risk decision that usually ends in rework, delays, and design changes after T1 samples.
A professional metal mold maker builds a Digital Twin of your part and mold, using simulation tools to predict how molten metal or sheet metal will behave under real process conditions. For casting molds, this includes metal flow, filling balance, temperature fields, and solidification. For stamping or deep drawing dies, it includes material flow, thinning, risk of tearing, and wrinkling behavior. This virtual phase is where most expensive mistakes should be eliminated.
Simulation as Insurance: Moldflow, FEA, and Forming Analysis
Advanced simulation—Moldflow, CFD, FEA, and metal forming analysis—is not just a technical luxury. For high‑volume or high‑value parts, it functions as insurance. By digitally recreating flow, pressure, and temperature, the mold maker can identify risk zones before they appear on a physical part: trapped gas pockets, potential porosity, cold shuts, incomplete filling, or areas where stress concentration may cause premature cracking.
For buyers, simulation reports are a powerful transparency tool. When you ask “how will this mold behave in mass production?” a professional supplier should be able to show you: metal flow animation, temperature distribution, predicted shrinkage, and critical areas that guided the design of runners, gates, vents, and cooling channels. A supplier that skips this step is effectively shifting trial‑and‑error cost to you in the form of longer ramp‑up times, higher scrap in early batches, and unpredictable quality.
The Mathematics of Shrinkage: Designing for Dimensional Stability
Every casting or hot‑work mold must compensate for metal shrinkage during cooling. It is tempting to apply a simple linear shrinkage percentage to the entire geometry, but real parts do not cool uniformly. Thick‑to‑thin transitions, ribs, bosses, and restricted areas around cores all cool at different speeds. The result is non‑uniform shrinkage that, if not compensated, produces warpage and out‑of‑tolerance dimensions.
In a robust metal mold manufacturing process, the engineer uses simulation and experience to map shrinkage and then slightly adjusts cavity geometry to compensate. This is especially critical for parts used in automotive, energy storage, or precision electronics, where holes, flatness, and interface dimensions must remain stable across thousands of cycles. A good supplier will talk about shrinkage not only as a percentage, but as a distribution—and will show how the mold design addresses it in critical regions.
For overseas buyers, the practical takeaway is simple: when evaluating how to make a mold for metal, do not just compare quotation PDFs. Ask how the supplier manages simulation, shrinkage mapping, and design validation before machining. This is the phase that determines whether you get a “prototype mold” that constantly needs adjustment, or a production‑ready tool that supports stable output from the first qualified run.
3. Phase II: The Metallurgical Backbone – Steel Selection Strategy
Even the best 3D model cannot save a mold built from the wrong steel. The steel grade and heat treatment process define how the mold will behave under repeated heating, loading, and contact with metal. In other words, metallurgy is the backbone of every decision about how to make a mold for metal that will last.
A professional mold maker does not select steel purely on price or habit. Instead, they start from the failure modes expected in your application. Is the mold for hot‑chamber die casting, where thermal fatigue and soldering to aluminum are concerns? Is it for high‑speed stamping, where abrasive wear, chipping, and galling dominate? Or is it for deep drawing, where smooth surfaces and compressive plastic deformation are more important than extreme hardness?
Matching Steel to Stress: Building a Failure Mode Matrix
For each mold, the tool room should build a simple failure mode matrix:
- Thermal fatigue from rapid temperature cycling in aluminum or zinc die casting.
- Abrasive wear from repeated metal‑to‑metal sliding in stamping dies.
- Plastic deformation in deep drawing where high forces and contact pressure dominate.
- Dimensional instability in prototype tools where lead time is prioritized over ultimate life.
Based on this matrix, the engineer selects steel types such as H13 or other hot‑work tool steels for die casting molds, D2/A2 for stamping and blanking dies, and P20 or pre‑hardened steels for faster‑turn prototype tools. For critical tools, premium variants like ESR or VAR‑grade steels improve fatigue resistance and toughness by reducing impurities and refining the microstructure.
From a buyer’s perspective, you do not need to know every steel code, but you should expect the supplier to explain why a certain steel was chosen for your mold, how it supports your expected volume, and what kind of maintenance interval you can realistically plan for over the tool’s life.
Heat Treatment and Vacuum Hardening: Unlocking Steel Performance
Steel only reaches its designed performance after proper heat treatment. For high‑quality metal molds, this often includes vacuum hardening to control oxidation, distortion, and internal stress. Poor heat treatment can result in soft spots, cracking, or dimensional changes during use—all of which translate into unscheduled downtime and costly rework.
In a controlled heat treatment process, the steel is heated to the appropriate austenitizing temperature, then quenched and tempered to the desired hardness. For precision molds, vacuum hardening provides a clean, stable environment that minimizes scale and reduces distortion. After treatment, critical dimensions may be re‑ground or hard‑milled to exact size.
For overseas procurement teams, the key question is not “do you heat treat the steel?” but “what heat treatment process do you use, and how do you control distortion and hardness distribution?” Suppliers with a mature metal mold manufacturing process can provide hardness reports, treatment specifications, and a clear plan for how heat treatment is integrated with machining and final fitting.
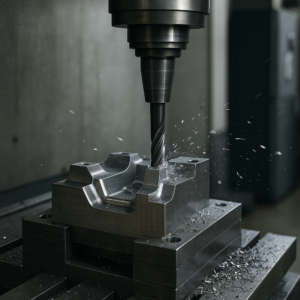
4. Phase III: Subtractive Manufacturing – The Art of Precision Removal
Once steel selection and heat treatment are decided, the mold blank moves into the subtractive manufacturing phase. This is where CNC machining, EDM, and manual bench work convert a block of steel into a highly precise metal mold capable of stable, repeatable production.
For B2B buyers, this phase is important not because you will run the machines yourself, but because it determines how accurate, repeatable, and maintainable your mold will be over time. When evaluating partners for how to make a mold for metal, you should understand which manufacturing technologies they use and how they control dimensional accuracy.
High‑Speed CNC Hard Milling for Precision Cavities
Modern tool rooms rely on high‑speed CNC machining, often machining the steel after heat treatment (hard milling). This allows the mold maker to maintain cavity geometry even after any minor distortion during heat treatment. With suitable CBN or ceramic cutters and stable fixtures, the CNC can achieve tight tolerance and excellent surface quality directly on the cavity.
For you as a buyer, the benefits are straightforward: better consistency between cavities, less hand polishing (which can alter geometry), and more predictable part dimensions across the life of the mold. When you ask a supplier how they make a mold for metal, pay attention to whether they mention high‑speed machining strategies, cutting tools, and fixture systems, as these directly influence quality and lead time.
EDM, Recast Layer, and Finishing
Electrical Discharge Machining (EDM) is indispensable for complex geometries, sharp internal corners, and deep, narrow features that CNC tools cannot reach. However, EDM leaves behind a hard, brittle recast layer that can develop micro‑cracks and negatively impact fatigue life if not properly removed.
A mature metal mold manufacturer manages EDM in stages: roughing passes to create the shape, semi‑finishing passes to refine it, and fine finishing combined with polishing or stoning to remove the recast layer. This approach balances machining time with long‑term durability.
When choosing a supplier, you can ask simple but revealing questions: How do you handle EDM finishing on functional surfaces? Do you have standard procedures for removing the recast layer? Their answers will tell you whether they are merely “making shapes” or actually engineering a long‑life mold that supports your production goals.
5. Phase IV: Thermal Management – Cooling is Production Currency
In high‑volume manufacturing, cooling time is often the largest component of total cycle time. Every second the mold stays closed for cooling is a second you are not producing the next part. This is why experienced buyers treat cooling design as a form of “production currency”—it directly defines how many parts per hour you can achieve and what your actual unit cost will be.
In the context of how to make a mold for metal, good cooling design is not only about drilling some straight channels in the mold base. It requires understanding the part geometry, wall thickness distribution, alloy behavior, and how close cooling channels can safely be placed to the cavity without compromising strength.
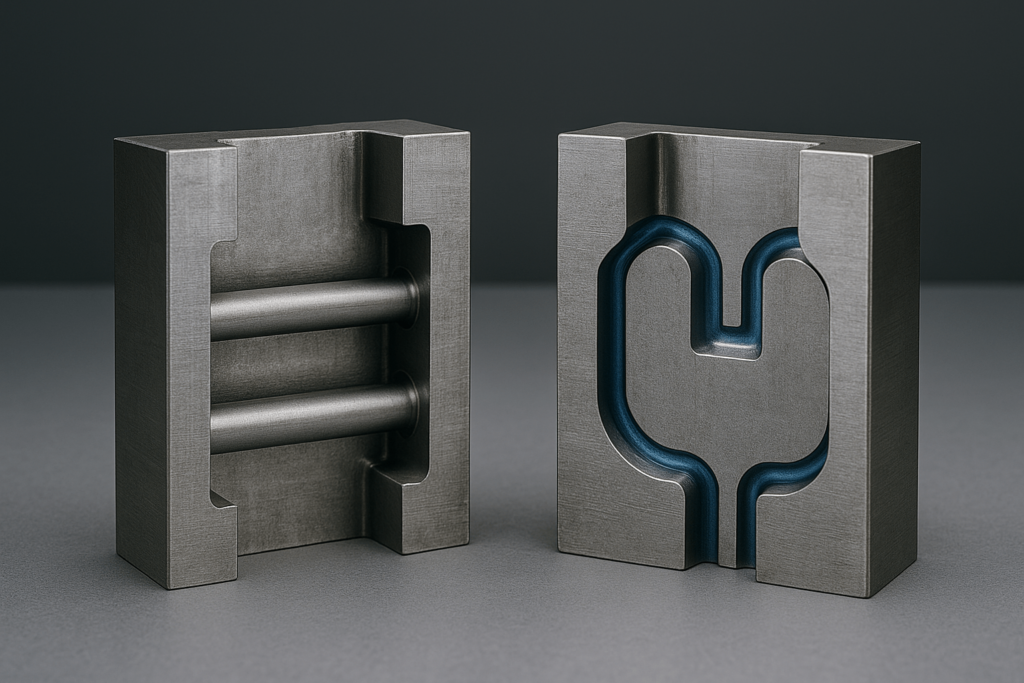
Conventional vs. Conformal Cooling: Geometry and Efficiency
Traditional cooling channels are drilled in straight lines. For simple parts, this works well enough. But for complex housings, irregular enclosures, or parts with deep pockets, straight channels leave certain areas under‑cooled, creating thermal hotspots. These hotspots lead to longer cycles, warpage, or uneven shrinkage.
Conformal cooling, often produced using metal 3D printing, changes this logic. Channels can be designed to follow the shape of the cavity, maintaining a nearly constant distance from the surface. The result is much more uniform temperature distribution, shorter cooling times, and more stable dimensions.
For B2B buyers sourcing metal molds, conformal cooling does not have to be used everywhere. It is a strategic tool. In areas where standard drilling cannot reach or where cycle time is critical, adding a conformal insert can significantly improve throughput without redesigning the entire mold.
The ROI of Cooling Design for Wholesalers and OEMs
Advanced cooling adds cost to the mold, but it also adds capacity to your production line. For high‑volume or long‑life projects, the payback time can be extremely short. A modest reduction in cycle time—e.g., from 40 seconds to 30 seconds—multiplies quickly over tens of thousands of cycles, lowering your effective tooling cost per part.
This is where TCO thinking becomes essential. When discussing how to make a mold for metal with your supplier, ask them not only what cooling design they propose, but why they chose it and what cycle time they are targeting. Suppliers with real experience will connect their cooling strategy to machine size, alloy choice, and your annual volume, giving you a clear picture of expected output, not just an upfront mold price.
6. Phase V: Surface Engineering, Venting Logic, and Release Behavior
Even with good steel, machining, and cooling, a mold cannot run reliably without well‑engineered surfaces and venting. Poor venting and surface design show up as gas marks, cold shuts, porosity, or parts that stick in the cavity and slow down production. For overseas buyers evaluating how to make a mold for metal, surface engineering and venting are key indicators of a supplier’s maturity.
A properly engineered mold surface does three things: it allows metal to flow and fill the cavity smoothly, it releases air and gas without creating flash, and it provides the right friction to enable stable part ejection.
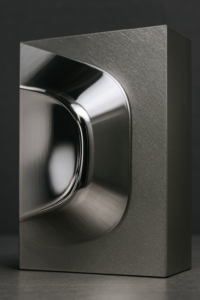
Surface Finish: Balancing Appearance and Function
Different applications demand different surface finishes. Mirror‑polished surfaces may be required for optical parts or visible cosmetic surfaces, but they can also create vacuum lock, making parts harder to eject. Textured surfaces (VDI, EDM textures, or chemical etching) can help gas escape, disguise minor cosmetic defects, and improve release behavior.
When you discuss surface finish with a mold supplier, it is helpful to talk about both aesthetics and process: Will this finish help or hurt ejection? Does it match the customer’s appearance expectations? Is it practical to maintain over the life of the mold?
Venting: Letting Air Escape Without Flash
Venting is one of the most underestimated topics in how to make a mold for metal. If air and gas cannot leave the cavity, the metal cannot fully fill it. The result is cold shuts, burn marks, or trapped porosity. Vent depths are typically very shallow, allowing gas to pass while preventing molten metal from escaping.
A well‑designed mold incorporates vents at the end of flow paths, parting lines, and around cores where air is likely to be trapped. Some vents may be built into ejector pins or removable inserts for easier maintenance. For buyers, the key question is: does the supplier treat venting as a deliberate part of design, or as an afterthought to be “fixed” during sampling?
Coatings and Surface Treatments for Longer Life
For demanding applications, surface coatings such as TiN, CrN, or DLC can greatly reduce friction, soldering, and abrasive wear. They act as a protective barrier between the molten metal or sheet metal and the base steel, extending maintenance intervals and improving surface stability over time.
From a sourcing perspective, coatings are a strategic option. They add cost, but on long‑running tools or abrasive applications, they may significantly extend tool life and stabilize cosmetic quality. When you explore how to make a mold for metal that serves you over many years, it is worth asking whether coatings are recommended, optional, or unnecessary for your specific project.
7. Phase VI: Strategic Process Selection – Casting Molds vs. Stamping Dies
Not every metal part should be produced with the same process. The best mold design for a high‑pressure die casting is very different from the best die set for progressive stamping or deep drawing. For wholesalers and OEM buyers, understanding this alignment is critical. It affects part performance, cost, and your ability to scale.
In many projects, we see questions like “Can we cast this instead of stamping it?” or “Can we move from welded assemblies to a single deep‑drawn part?” The answer often depends on geometry, annual volume, tolerances, and downstream assembly requirements. A responsible metal mold manufacturer will not simply agree to whatever is requested; they will help you select the most suitable process.
Progressive Stamping Dies for High‑Volume Sheet Metal Parts
For sheet metal brackets, terminals, housings, and automotive or electronics hardware, progressive stamping dies offer unmatched efficiency. The metal strip advances through a series of stations in a single die set, performing punching, bending, forming, and sometimes coining within one continuous process.
A well‑designed progressive die requires careful strip layout planning, station design, and robust guiding systems. It is a major investment, but for high‑volume components, the resulting part cost is extremely competitive. When discussing how to make a mold for metal sheet components, ask potential suppliers how they approach strip layout, how many stations they expect, and what type of guiding and stripper systems they use to ensure repeatability.
Deep Drawing Dies for Seamless, High‑Strength Components
Deep drawing is ideal for making seamless cups, housings, and enclosures from sheet metal—especially where joint strength or leak tightness is important. The die set must carefully control blank holding force, punch‑to‑die clearance, and lubrication conditions to avoid tearing or wrinkling.
For buyers, deep drawing is often attractive when it allows you to replace welded or assembled parts with a single, stronger component. However, the tooling and process window must be engineered carefully. In conversations about how to make a mold for metal deep‑drawn parts, look for suppliers who can explain draw ratio limits, material selection (e.g., stainless steel, low‑carbon steel, aluminum), and how they manage thinning across multiple drawing stages.
Ultimately, choosing between casting, stamping, bending, welding, and deep drawing is a strategic decision. An experienced partner will not only build the mold or die, but also help you compare process routes in terms of cost, lead time, and risk—and recommend the solution that best supports your market and volume.
8. Phase VII: The Unit Cost Equation (TCO) and Maintenance Planning
For overseas buyers and wholesalers, the final measure of a successful metal mold is not only whether it works, but how it performs economically over time. This is where Total Cost of Ownership (TCO) becomes your most important metric.
A competitive quote with poor TCO can quietly destroy your margin: frequent repairs, high scrap, unstable dimensions, and inconsistent cosmetic quality consume far more value than the initial savings. A mold that seems “cheap” at the beginning can become the most expensive option after one or two years of production.
Looking Beyond the Quote: How to Evaluate TCO
When you evaluate how to make a mold for metal in a strategic way, you look beyond the initial tooling price and consider:
- Cycle time: How many seconds per shot or stroke? How does cooling design affect throughput?
- Scrap rate: What defect rate is realistic during stable production, and how will simulation and venting help minimize it?
- Maintenance frequency: How often will you need to stop for polishing, re‑fitting, or component replacement?
- Spare parts and wear items: Are critical inserts, punches, and lifters designed to be easily replaced, or will every repair require heavy bench work?
- Documentation and traceability: Does the supplier provide 2D drawings, BOMs, and maintenance recommendations for the mold?
These elements together define TCO far more accurately than a single tooling quote. When reviewing suppliers, pay attention to how clearly they explain these points and whether they proactively discuss life‑cycle cost rather than only price.
Preventive Maintenance: Protecting a Long‑Life Asset
Every metal mold is a capital asset. With proper preventive maintenance—cleaning, lubrication, vent clearing, surface touch‑ups, and periodic re‑alignment—it can produce reliable parts for years. Without it, even the best design deteriorates quickly.
A professional metal mold manufacturer should provide a basic maintenance plan: recommended cleaning intervals, lubrication points, and inspection guidelines for wear surfaces. For complex tools, they may also specify when to perform stress tempering, when to re‑polish high‑gloss surfaces, and how to store the mold between production campaigns.
For overseas buyers, a simple but effective practice is to integrate mold condition into your regular supplier audits. Asking to see the physical mold, maintenance records, and repair history reveals a lot about how seriously your partner treats tooling health. This is a practical extension of the question “how to make a mold for metal” into “how to keep a metal mold profitable across its entire life cycle”.
10. Quick Step-by-Step Summary: How to Make a Mold for Metal (Industrial)
- Define requirements & choose the manufacturing process (casting, stamping, deep drawing) based on geometry, tolerances, and volume.
- Create a Digital Twin using simulation (Moldflow/CFD/FEA) to validate flow, shrinkage, stress, and filling behavior.
- Select mold steel & define heat treatment, matching steel grade to failure modes (thermal fatigue, abrasion, deformation).
- Machine the mold using CNC hard milling + EDM, followed by removal of recast layers and precision fitting.
- Engineer cooling and venting, addressing hotspots, cycle time reduction, and uniform shrinkage control.
- Apply surface textures or coatings depending on cosmetic needs, flow behavior, or wear requirements.
- Conduct trials (T1–T3) to validate dimensions, optimize processing parameters, and finalize mass‑production readiness.
- Plan TCO and maintenance, including expected mold life, spare inserts, lubrication points, and cleaning intervals.
11. Types of Molds for Metal Casting and Where Steel Tooling Fits
Metal casting molds fall into several categories. Understanding these helps overseas buyers choose correct tooling and avoid misalignment with project needs.
Sand Molds (Expendable)
Ideal for low–medium volume, prototypes, and complex shapes. Patterns can be 3D‑printed or machined. Not suitable for long‑life production because molds are destroyed after each pour.
Permanent Metal Molds (Steel/Alloy Tooling)
Used for die casting, gravity casting, and high‑volume industrial applications. These are the molds discussed throughout this article—designed for repeatability, long life, and tight tolerances.
Investment Casting Shells
Used for intricate geometries or high‑precision components. Shells are expendable but deliver excellent detail.
Graphite or Plaster Molds
Used for special alloys or low‑reactivity environments.
Why this matters for buyers:
Some suppliers may quote you a “casting mold” when they mean a prototype sand mold. For industrial OEM/ODM production, always confirm you are being quoted permanent metal tooling, not expendable molds.
12. Safety, Compliance, and Environmental Considerations
Industrial metal molding is not comparable to casting metal at home. While DIY articles online focus on hobby casting, real manufacturing involves:
- high‑temperature metal handling,
- controlled ventilation,
- alloy fumes management,
- dust extraction,
- operator PPE and training,
- workplace certifications.
At YISHANG, RoHS and ISO 9001 systems ensure that each tooling and production run follows controlled procedures for safety and environmental compliance. While this article focuses on engineering and procurement, buyers should always verify a supplier’s safety, quality, and compliance systems when choosing a metal mold partner.
13. How to Evaluate a Metal Mold Manufacturer (Checklist for Overseas Buyers)
Use this quick checklist when comparing suppliers in China or globally:
- Simulation capability: Moldflow/CFD/FEA availability.
- Tooling workshop: In‑house CNC, EDM, polishing, fitting.
- Material expertise: Ability to explain steel selection.
- Cooling/venting design: Shown via drawings or reports.
- Industry experience: Automotive, electronics, vending, energy storage.
- DFM communication: How clearly the supplier explains risks.
- Sample schedule: Transparent T1–T3 plan.
- Traceability: Provides drawings, BOMs, heat‑treatment reports.
- Maintenance support: Spare inserts, surface re‑polishing, cleaning guide.
A capable manufacturer should confidently answer all checklist points without hesitation.
14. FAQ: Common Questions About Making Molds for Metal
1. What is the cheapest way to make a mold for metal casting?
Sand molds are cheapest, but not suitable for long‑term industrial production. Steel molds cost more but reduce unit price over time.
2. Can one metal mold be used for different alloys?
Sometimes yes—but thermal fatigue, soldering behavior, and expansion rates vary. Always confirm compatibility.
3. How long does an industrial metal mold last?
Depending on process and steel: from tens of thousands of cycles (deep drawing) to millions (progressive stamping).
4. Is casting metal at home a good way to prototype industrial parts?
DIY casting cannot replicate industrial tolerances or mechanical properties. Use CNC‑machined prototypes instead.
5. What is the difference between a metal casting mold and a stamping die?
Casting molds shape molten metal; stamping dies shape sheet metal under force. They are designed very differently.
6. How do I choose a mold manufacturer in China?
Look for: simulation capability, in‑house tooling shop, ISO/RoHS certification, transparent DFM, and proven OEM/ODM experience.
9. Conclusion: Turning Metal Molds into Strategic Assets: Turning Metal Molds into Strategic Assets
Understanding how to make a mold for metal is not only about cavity shapes and steel grades. It is about connecting engineering decisions to business outcomes: cycle time, defect rate, delivery reliability, and total cost per part. For global OEM/ODM buyers and wholesalers, the best metal mold is not simply the cheapest; it is the one that protects your supply chain while enabling long‑term margin.
At YISHANG, our engineering team combines simulation‑driven design, controlled steel selection, high‑precision CNC and EDM machining, optimized cooling and venting, and structured maintenance planning. Backed by more than 26 years in metal fabrication and tooling for industries such as automotive, electronics, appliances, vending machines, energy storage, and industrial hardware, we support customers who need both custom metal molds and series production of metal parts under one roof.
If you are currently planning a new project and considering how to make a mold for metal components—whether for sheet metal parts, metal cabinets, frames, brackets, or custom assemblies—we can support you from DFM and prototype tooling to mass‑production molds and long‑term supply.
Ready to turn your next mold into a strategic asset instead of a cost center? Contact the YISHANG engineering team for a detailed DFM review, metal mold manufacturing proposal, and OEM/ODM production plan tailored to your target market and volume.