
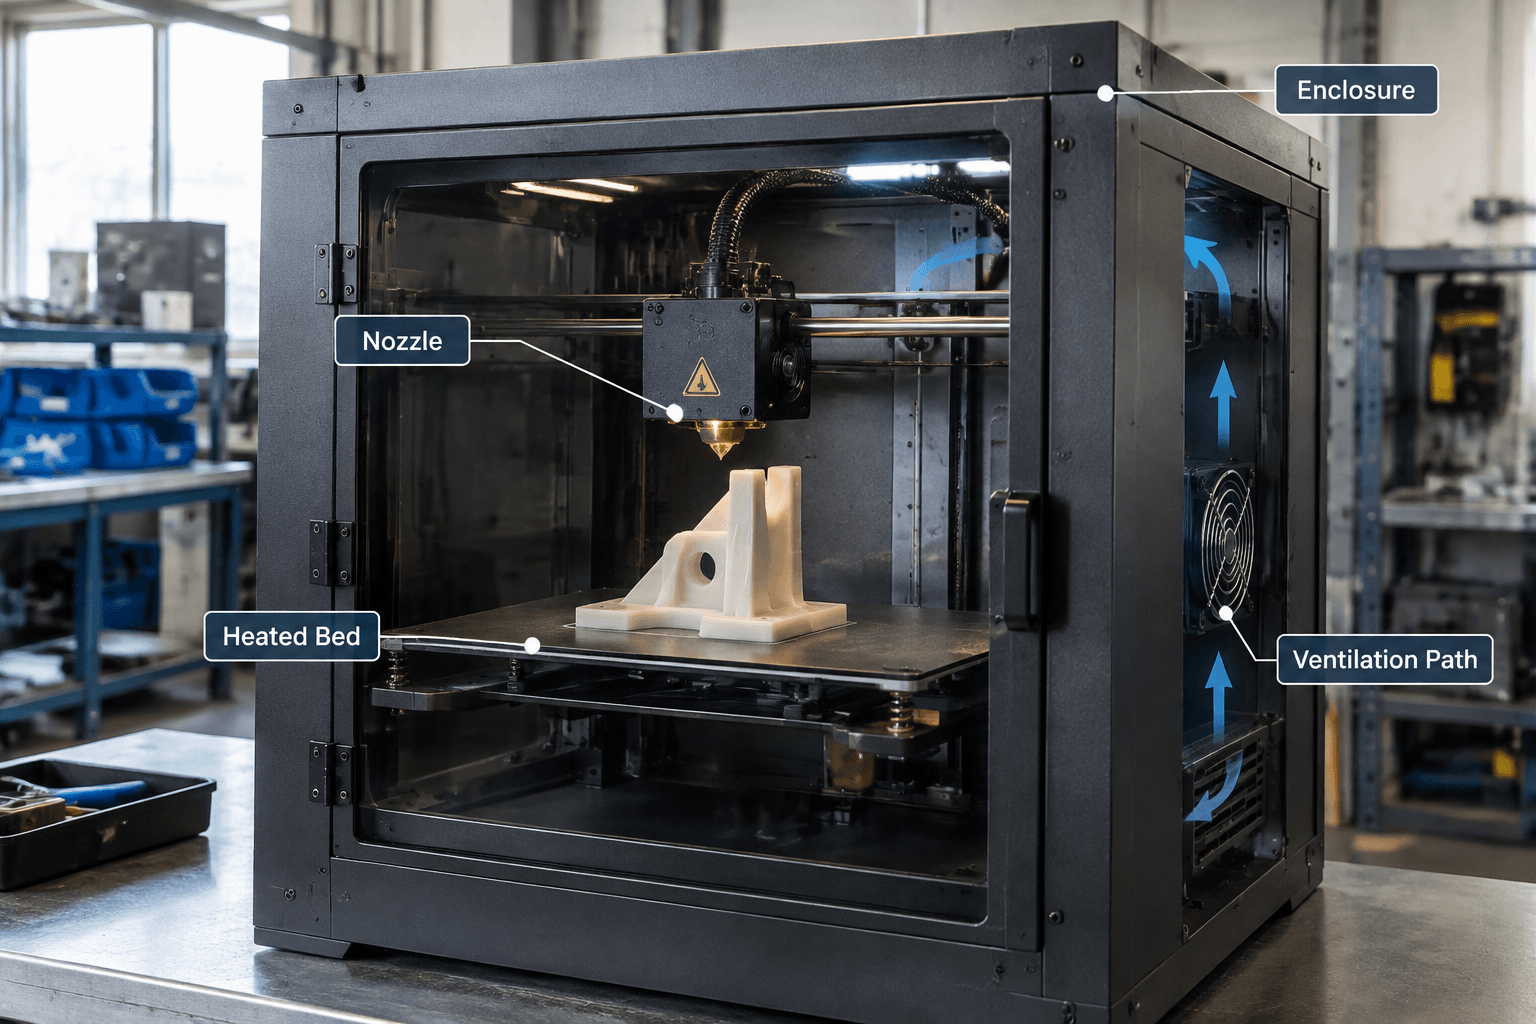
The most important ABS printing tips are to begin with the filament maker’s temperature range, clean and prepare a compatible build surface, stabilize the temperature around the part, minimize unnecessary cooling, and change only one setting at a time. Reliable results depend on the ABS formulation, printer, surface, environment, and part geometry, so no single ABS profile works for every setup.
ABS contracts as it cools. If different areas of a print cool at different rates, the resulting stress can lift corners, split layers, or distort dimensions. Successful FDM or FFF printing therefore requires more than raising the nozzle and bed temperatures: the complete process must keep extrusion, first-layer contact, and part cooling reasonably consistent.
Check the Printer, Enclosure, and Ventilation First
Before developing ABS settings, confirm that the printer manufacturer currently permits ABS or materials requiring comparable operating conditions. Check the supported hot-end temperature, heated-bed capability, approved build surfaces, enclosure requirements, and any restrictions affecting tubing, toolhead components, electronics, power supplies, or lubricants.
An enclosure can reduce drafts and slow uneven cooling, but an enclosed printer is not automatically suitable for ABS. Some machines keep heat-sensitive electronics outside the warm build area; others do not. Do not add an improvised enclosure unless the printer manufacturer allows it and the machine’s components can operate safely in the resulting environment.
Set up the printing area in this order:
- Choose a stable location. Keep the machine away from open windows, air-conditioning outlets, fans, doors, and other sources of rapidly changing airflow.
- Confirm enclosure management. Preheat or condition the build area according to the printer manufacturer’s instructions. Avoid opening the enclosure during a print unless intervention is necessary.
- Provide appropriate ventilation. Review the current safety data sheet for the exact filament and follow the printer and material manufacturers’ emissions guidance. An enclosure helps control temperature, but it does not replace ventilation or engineered extraction.
- Set a stop condition. Stop printing if there is smoke, overheating, electrical distress, an unusually strong or changing odor, or evidence that a component is exceeding its approved operating conditions.
Keep people from unnecessarily occupying the immediate printing area. If filtration is used, verify what the system is designed to capture and follow its maintenance schedule rather than assuming any filter makes emissions harmless.
Build ABS Settings from Manufacturer Ranges
Use the range printed on the spool, technical data sheet, or current filament profile as the starting source. A profile copied from another user may involve a different ABS blend, thermistor, nozzle, build plate, enclosure, slicer, or part size.
| Variable | Starting source | Signal for adjustment | Main trade-off |
|---|---|---|---|
| Nozzle temperature | Filament maker’s stated range, checked against printer limits | Raise gradually if layers bond poorly or extrusion appears inconsistent after mechanical causes are excluded. Lower gradually if material degrades, strings excessively, or loses detail. | More heat can improve flow and bonding, but excessive heat can worsen stringing, surface quality, odor, or material degradation. |
| Bed temperature | Filament and build-surface guidance | Adjust if the clean, correctly leveled first layer releases early or remains excessively soft. | Insufficient heat can reduce adhesion; excessive heat may distort lower layers or exceed surface limits. |
| Enclosure condition | Printer manufacturer’s approved procedure | Investigate drafts or temperature swings when corners lift or cracks form as the print grows. | A warmer, stable environment can reduce stress, but excess enclosure heat may affect the printer. |
| Part cooling | Filament or printer profile | Begin with little or no unnecessary cooling, then add only what bridges, overhangs, or detail require. | Cooling can sharpen features but may increase shrinkage, corner lift, or weak layer bonding. |
| Print speed | Validated printer profile or a conservative manufacturer baseline | Reduce speed if extrusion cannot remain consistent or layers do not have enough time to bond. | Slower printing can stabilize extrusion, but it cannot correct contamination, severe drafts, or unsuitable hardware. |
| Flow or extrusion multiplier | Calibrated baseline for the machine and filament | Change only after checking filament diameter assumptions, nozzle condition, extruder grip, and temperature. | Excess flow causes ridges and dimensional error; low flow produces gaps and weak walls. |
| First-layer settings | Surface guidance plus a first-layer test | Adjust nozzle-to-bed relationship, first-layer speed, and first-layer flow from the visible contact pattern. | Too little contact releases easily; too much compression causes ridges, poor dimensions, or nozzle drag. |
Treat the first layer separately from the rest of the print. It may need a slower speed, different cooling behavior, or other slicer-specific treatment. Do not compensate for an incorrectly positioned bed by continually increasing flow or temperature.
For calibration, use a small representative test with the same nozzle, build surface, filament, and enclosure arrangement planned for the part. First verify extrusion and the first layer. Then test nozzle temperature, followed by cooling and speed. Evaluate larger geometry only after the basic profile is stable. Record each change and return to the last successful condition if the result becomes worse.
Prepare the Surface and Reduce Corner Lift
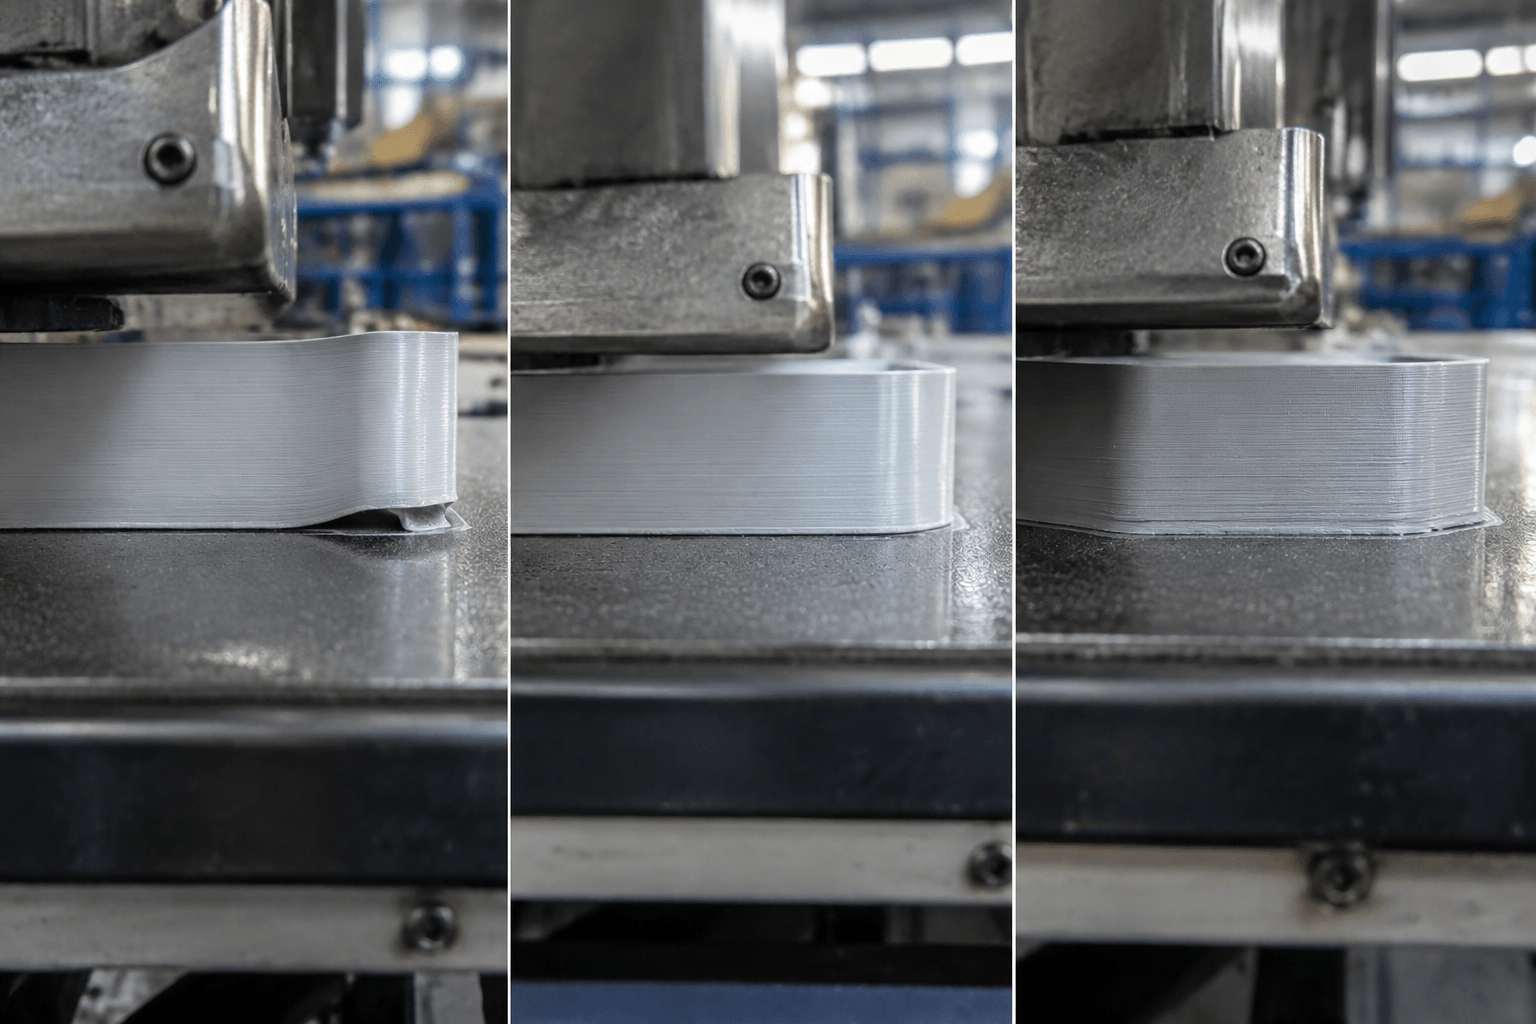
Adhesion begins with a compatible, undamaged build surface. Follow its manufacturer’s cleaning procedure because solvents, detergents, coatings, and abrasives that are acceptable for one plate can damage another. Avoid touching the active area after cleaning; skin oil can create isolated release points.
- Inspect the plate. Look for residue, coating damage, raised debris, or old adhesive that could change the first-layer height.
- Clean it as specified. Use only approved materials and allow the surface to dry fully.
- Check bed position or mesh. Mechanical looseness, an incorrect offset, or a poor mesh cannot be solved reliably with extra adhesive.
- Print a first-layer test. Lines should contact one another and the surface consistently without rounded gaps, deep ridges, or material being scraped aside.
- Add an approved adhesion aid if needed. Some products function as release layers as well as adhesives. Confirm compatibility with both the plate and ABS.
- Use a brim selectively. A brim increases contact around vulnerable edges, but it does not correct a dirty plate, unstable temperature, or severely incorrect first layer.
Geometry also affects warping. Large flat footprints, sharp external corners, long straight walls, abrupt thickness changes, and thin sections connected to heavy sections can concentrate thermal stress. Helpful design options include rounding corners, dividing a large part, adding removable anti-warp features, using a different orientation, or making wall transitions more gradual. These changes must still be checked against strength, appearance, support, and dimensional requirements.
After printing, let the part and build plate cool according to the surface manufacturer’s instructions. Forced cooling or immediate enclosure opening can introduce another abrupt temperature change and may make removal more difficult.
Troubleshoot ABS Prints by Symptom
Diagnose the visible symptom before changing the profile. Several defects look similar, and settings cannot compensate for wet material, a blocked nozzle, damaged hardware, or an unsuitable printer.
| Symptom | Likely areas to inspect | Next controlled adjustment |
|---|---|---|
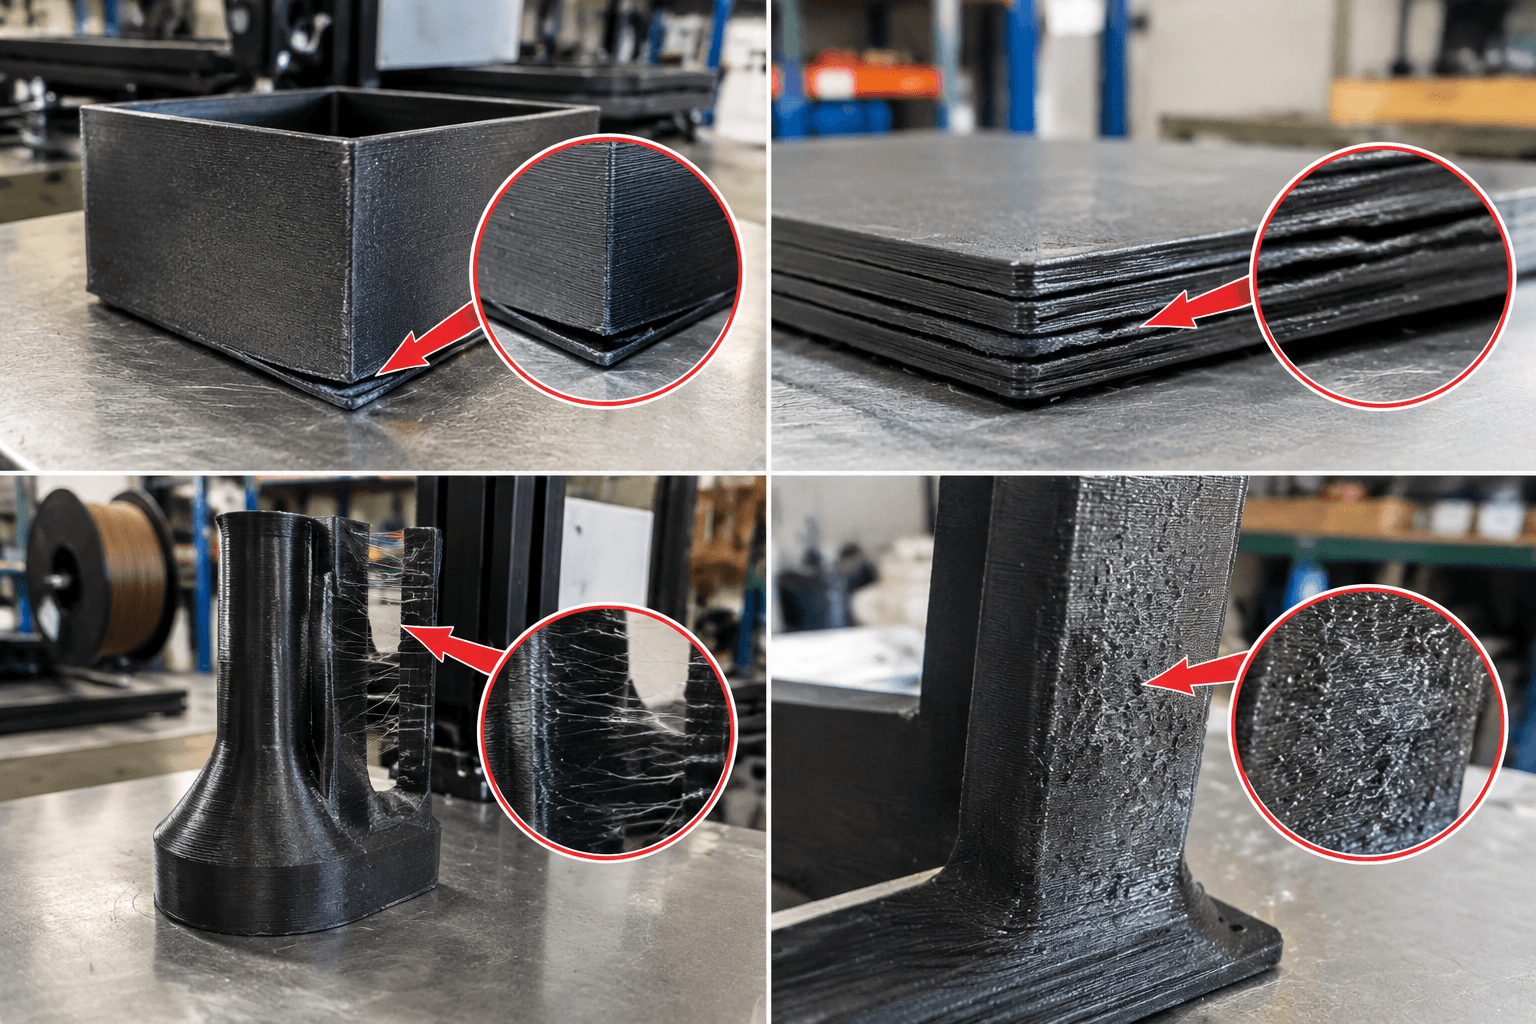
| One or more corners lift | Surface contamination, weak first-layer contact, drafts, uneven bed temperature, insufficient brim, or stress-heavy geometry | Clean and verify the first layer first. Then stabilize the environment or test a brim before changing multiple temperatures. |
| The complete part detaches | Incompatible surface, contamination, incorrect offset, bed movement, or first layer printed too quickly | Stop and inspect the surface and machine setup. Run a first-layer test rather than restarting the full part. |
| Horizontal cracks or layer separation | Rapid cooling, excessive fan use, low nozzle temperature for that filament, under-extrusion, or insufficient enclosure stability | Check extrusion hardware and airflow. If both are sound, test one higher nozzle-temperature step within the maker’s range or reduce unnecessary cooling. |
| Stringing or curled small features | Excess heat, unsuitable retraction, travel behavior, slow layer timing, or moisture | Confirm filament condition, then tune temperature before making small retraction changes. Avoid extreme retraction that can cause jams. |
| Popping, bubbles, rough extrusion, or an irregular surface | Possible moisture, contamination, partial blockage, or unstable feeding | Inspect the spool path and nozzle. If moisture is plausible, dry the filament only under its manufacturer’s specified conditions and store it sealed afterward. |
| Bulged lower layers or dimensional distortion | Bed too hot for the material and geometry, excessive first-layer compression, excess flow, or heat accumulation | Check first-layer contact and flow calibration, then test a small bed-temperature reduction within approved guidance. |
| Weak walls with visible gaps | Under-extrusion, low temperature, excessive speed, nozzle restriction, or slicer wall settings | Verify mechanical feeding and nozzle condition before changing flow. Reduce speed or adjust temperature one step at a time. |
Moisture-like symptoms are not proof that the spool is wet. A partial clog, slipping drive gear, tangled spool, damaged nozzle, or incorrect material profile can produce similar roughness. Likewise, raising bed temperature is not the first answer to every adhesion failure.
Frequently Asked Questions
Is ABS a good choice for functional 3D-printed parts?
ABS can be useful where its particular balance of toughness, temperature behavior, machinability, and post-processing suits the application. Suitability still depends on the specific grade, print orientation, layer bonding, loads, environment, dimensions, and safety requirements. Do not substitute generic filament properties for tested properties of the finished part.
Can ABS be printed safely on an open-frame printer?
An open-frame printer may be physically capable of reaching the listed temperatures, but drafts and rapid heat loss can make larger ABS parts difficult. Emissions must also be managed. Check current printer and filament guidance, provide appropriate ventilation, and do not assume a temporary enclosure is safe for the machine.
How can I confirm whether a specific printer supports ABS?
Check the printer manufacturer’s current material list, maximum operating conditions, approved build plates, enclosure instructions, and ventilation guidance. Then compare these requirements with the exact filament’s technical and safety documentation. A community profile is not a substitute for machine compatibility information.
Should ABS filament be dried before printing?
Dry it when the manufacturer recommends drying, storage history suggests moisture exposure, or diagnostic tests support that conclusion. Use the specified drying conditions and suitable equipment; excessive heat can deform the spool or damage the material. Seal the filament with desiccant after drying.